Showing posts with label refashion. Show all posts

Monday, 2 April 2018

Tutorial: DIY Halterneck Backless Crop Top from old T-shirt


Hi Everyone!
Summer is soon approaching!
Am here today with a very simple tutorial on how to make a stylish Halterneck Backless Crop Top. That too, re-purposed and reused from an old t-shirt.


At times its difficult with kid's clothes. This T just shrank one size after first wash. My daughter just adores the color and 'Bambi" appliqué on it. So here, I just had to do something about it...Can't just throw it away?
 
After having seen and being inspired by many crafters and DIYers do T-shirt refashion, I came up with my plan. So out came the scissors and..
Just neatly cut away the sleeves so that:
a) there is one inch shoulder left, next
b) turn over the T-shirt and chop off the back in a neat line above the armhole level
c) What is left of the back ,cut a vertical line from top to bottom in the center.

Now gather all the chopped off fabric, DON"T throw away.
I picked the stitches and lay the pieces straight flat on floor and
Chop, chop...
Cut horizontal strips of about 1 inch or 2.5 cm thickness
 

Now this is fun part
You just have to do it to enjoy it
Hold the two free ends of the strip and give a good pull
and you have a neat cord with free edges neatly folded in which just don't need to be stitched

Now I sew a cord on each shoulder for the neck tie for halterneck pattern.
I also attached two cords one on each side of the back to secure the halterneck backless crop top.
 

Vow its done...She looks pretty in this. Very Summer-ish.
 
This is the back which shows the two tie ups at the back and on the neck of the halterneck top.

Also made a matching bracelet with the left over cords which can do double duty as pony tail hair band or as of course the bracelet. Look here...

Am a cotton/satin/silk stitched top person, but now am in look out for Ts.
Its so quick...
its addicting...

Am also featured in
http://www.thecharmofhome.blogspot.in/
http://www.romantichome.blogspot.in/ 

Saturday, 19 August 2017

Drab to FAB: Painted Leather Bag: Season 2

Hi! When I did my first painted leather purse (My last post: Drab to FAB: Painted Leather Bag), I did not know it would be so addictive.
I dug out yet another leather bag..

Ta da...

My old leather bag, as you see was in black and white.
One of my favorite color combination..
But, again the white lost its glamor with time...
The stitching, lining, lock, zipper, all are in excellent condition...
 And, so
Another Drab to FAB project.
As I did in the last bag: Wipe clean the surface of leather to be painted with alcohol.
Then, start by using a red and a black ink pen to draw floral pattern on the bag..
 Here is a close-up of the pattern.
Just free hand..
Just fill up...
 You may appreciate that I highlighted the outlines of stems and leaves with a permanent marker black pen
 Time to color:
Acrylic paint
Use more than one coat of color
Have loads of patience
Wait in between coats of paints.
 I never had any shocking bag.
Always have had safe collection of black, beige, white, tan, navy blue, red,...
So went adventurous this time
Colored the background a bright sky blue.
 My floral print has grown green leaves.
You can see that the marks of the pens are very much visible..
Which actually give details and depth to the painting...
 All flowers painted.
Some pen markings have got covered by layers of acrylic paint..
Don't worry you can redo the markings on top of the paint again...
Here's my bag ready to go out into the world again...

I like it.
Its bright..
Happy...
Very cheerful!
Satisfying craft.

Tuesday, 18 July 2017

Drab to FAB: Painted Leather Bag

Hi!
Had been wanting to do this craft since a long time.
Watched many Internet sources and videos.
Finally did it.

This was a favorite bag of mine in white leather. As with other white objects, this bag also lost its luster. But the lining, chain and lock is still in excellent conditions. Just couldn't throw it away.

Wiped  the surface with cotton dipped in alcohol to remove any protective layer over the leather and to prepare the leather for new pigment.
I used acrylic colors.
You need more than two coats of diluted acrylic with water (1:1 ratio). Crush and twist the bag well before each coat, so that the next coat fills in any crack or wrinkle.
BE PATIENT!
Let the paint dry completely between each coat of color.
Once you are satisfied with the color, give final UNdiluted coat of acrylic paint.

Recently I was watching many videos on brush painting art of Rosmaling.
This is my first attempt at Rosemaling.

After many patient hours
My bag is ready!!

Here is my new bag :)

It looks great! I wore it to a party and my friends liked it.
You got to try painting leather...

Am joining link parties at

Saturday, 1 July 2017

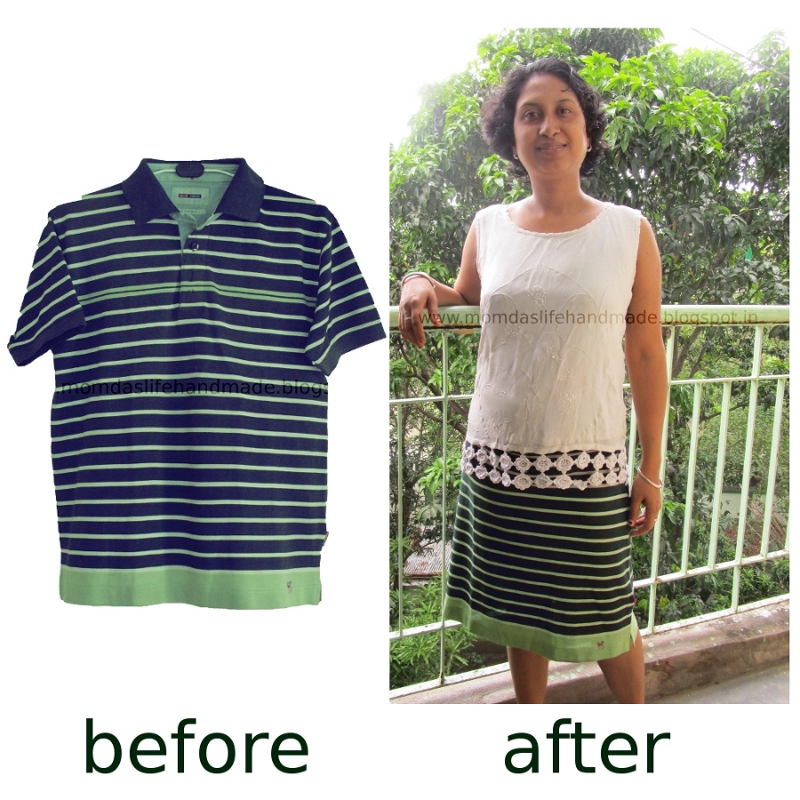
HIS T-shirt Now MY SKIRT: Easy Refashion

Hi! Summers were ON some time back, and I was just doing some cleaning of the house. Basically trying to get rid of unwanted stuff.
When I noticed a T-shirt of my Hubby, which he had stopped wearing for quite some time. And thanks to inspirations from other blogers and pinterest, came up this project of easy refashion.


This was my Hubby's T-shirt.


Just cut off the collar with a bit of shoulders.
And next cut the sleeves in straight lines.
Sew up the sides such that the upper part is the same size as my waist.
Neatly fold and stitch the waist hem line.
Lucky ones with slim waistline can put in an elastic in the waist hem line.

The skirt is ready to wear..
Oh! Just excuse the cloth pins. I used them to hang the skirt on the hanger while taking the pic.

The skirt is so comfortable. I wear it so often at home.
Perfect summer wear.

Well, I missed on posting a refashion post in Me Made May 2017, as I left for the lovely Tawang trip (see Tawang with me by clicking here).
Here is one.
See you soon again...

Am also joining link parties at

Sunday, 7 May 2017

Me Made May 2017: Day 7

Hello Sunday!
Hi Everyone!

Day 7:


The fabric is Mekhala or wrap around from certain part of Assam, India.
The cloth is woven with a border in the lower part only.
This particular fabric is a check weave with yellow and dark blue threads
With woven border in lower part in yellow, white, green and blue.
This is like a shirt dress without collar..
Front button down...

I team it with jeans or leggings..

Hope you enjoyed the journey so far...
See You tomorrow with yet another of my creations..

Also linking this post with

Friday, 28 April 2017

ME MADE MAY 2017 ! Am Participating!!!

Hi Friends!
May is coming again, and
 Am participating in


I have pledged to

wear and show one dress made by me for myself or my daughter, each day of May for the entire month!

I really appreciate the interest shown by You All last year,
Hope You shall enjoy my endeavors this year too...
You can also see my pics on pinterest too...

Tuesday, 20 December 2016

RED EMBROIDERED SWEATERS: BEFORE & AFTER

Hi!
 
Vacations really catch you up! Had been wanting to post this since last week...
 My kids moved to a different school and so different school uniforms. Had to do something with the school sweaters. They are almost new and well fitting.

 Here is the sweater, to begin with I simply picked out the stitches holding the school logo, very neatly.

 This is my son's sweater with a potted Christmas tree. The decorations are sequins just stuck using fabric glue. The star on top and small ones on sleeves are embroidered.

 This is the first time, am embroidering on knitted garment. Believe me it's very easy, especially if you are using wool. Use very simple basic stitches.

 Here is my daughter's sweater. Logo out. Sketched a pine tree branch in pen, amd also snowflakes on the sleeves.

 Using pale green wool to sew in some pine leaves/needles. Did the branches and stem in Grey wool

 Here is this sweater complete with pines (which are silver and golden sequins glued in clusters) and snowflakes on sleeves.

This sweater is so appropriate for the season and time of festivity, that these have become Aarotrika and Adhrit's favorite sweaters. They wear them everyday to park..

Hope you enjoyed my little venture and will pull out your own stuffs and embelish them and upcycle them and restyle them..

WISH YOU ALL
MERRY CHRISTMAS
AND
HAPPY NEW YEAR

Friday, 14 October 2016

EMBLISHED T-SHIRTS

Hi! A few days back I stumbled upon a folder in computer with some pictures of my adventure in turning bland T-shirts into funky ones. I took these pictures some four years back maybe..
See how I jazzed up two plain high neck T-shirts..
 My kids four years back
How time flies...

OK, I started by buying plain high neck full sleeves T-shirts in sunny yellow and lemon green for my kids. I still do so: buy plain Ts and jazz them up to get a customized unique wardrobe member.
Note in the next image I drew some outlines with pencil on the T

All I did was simple patchwork or appliqués,  simple stitches as stem, back, chain or button-hole, a few buttons here and ribbon there, and sometimes acrylic paint..
Here is a scene of kids having fun on a sunny day near home

I don't spare any surface :)
Here is a scene inspired from The Ratatouille animation movie, on the other side of T

Now the next T-shirt
Here are my kids cycling up a small hillock upto an apple tree
See the apples are small buttons

On the other side of T...
The shoes lace are red satin ribbon stitched up sparingly on to the T

My kids
My Kids saying cheeese
Hope you all enjoyed my early venture into photographing from my early days of blogging.

Saturday, 27 August 2016

FAUX MALACHITE BOX under GREEN LAMP SHADE

Hi Everybody!
Today in the green series, am going to share with you how I made a faux malachite green box and recoloured my lamp shade..

Lets start with the malachite box
Materials used are:
A small wooden box
Emerald green, black and white acrylic colours
Little alcohol
Sand paper and a soft cloth
Flat fan brush or round tip brush

Start by sanding the the box with sand paper to remove any traces of polish.
Next dab a little alcohol on a soft cloth and clean the metallic areas to free them from any polish or dirt

Now there are two ways of adding colour:
1. Drop green, black and white in random array next to each other as shown, then using flat fan brush pick colour and swirl all around the surface of box in curvy motions to form a pattern OR
2. As the box is small I preferred to use a simple round tip brush to paint the pattern.

The images bellow show how the colour curves move in continuity from one surface to the other. Also neatly fill colour in between metal pieces, such that no piece of wood is seen.

My little malachite box now sits pretty here and there in my living room

Well long back I painted a fabric lined lamp shade in terracotta base colour with
Kalamkari style designs
Now the lamp does not stand out in my current room decor..
So I painted over to change the look of this shade

I used emerald green to cover the terracotta colour of the back ground

See the difference
My lamp shade got a new life

Here is a glimpse of my table top with the malachite box under the green lamp shade..
Hope you all like my series of green accessories..
Green has a lovely calming effect..

Vibrant Mushroom Botanical Watercolor Painting with Printable

  Vibrant Mushroom Botanical Watercolor Painting is a great Artwork to own. Watch me paint Bright Watercolor Mushroom and you can enjoy this...